06.17.09
Broken XBox 360 Wireless Receiver for Windows
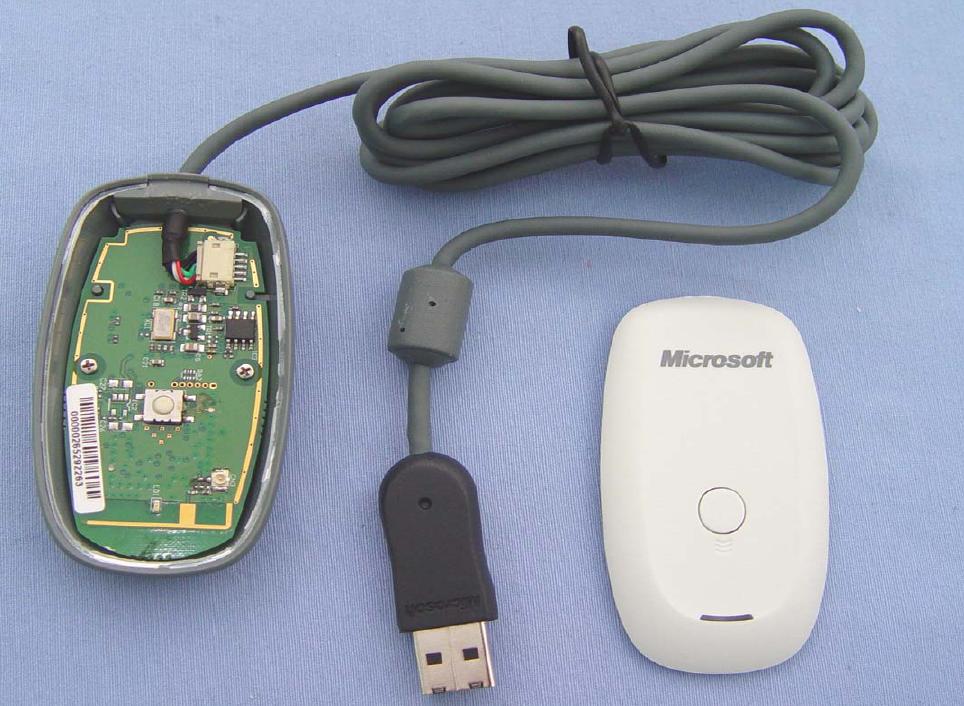
My XBox 360 Wireless Receiver for Windows died. No more green light, no more being recognized by the OS when I plugged it in. Weirdly enough, the first one I got was like this on purchase so I exchanged it for this one which worked fine… up until now.
Luckily, I found this fix which worked brilliantly. Amazing the fuse blows so easily, and so irrevocably and yet nothing else on the USB chain had any issues at all. Bad Microsoft hardware I guess…
Opening the receiver (use a knife or something to lever the top off):
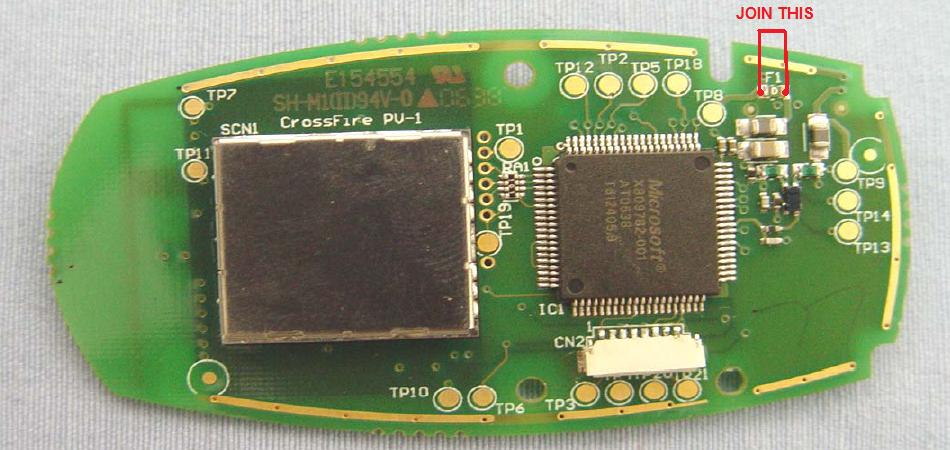
Unscrew and turn the circuit board over then solder across F1:
Notes from the comments:
- You can test whether this will work by connecting something like a paperclip across the fuse without desoldering it, then plugging it into your PC.
- Apparently you can use foil paper and electrical tape to connect across the fuse. Personally I’d recommend soldering, but if you don’t have a soldering iron it’s worth a try.
- If “lever the top off” isn’t explicit enough for those not insane enough to pull apart everything they own, to get the case off jam, and I mean JAM, a butterknife in. Wedging it in the crease that is above the wire (between grey and white). Getting it in there good then wiggle and twist all about until the glue gives way. Because every inch other then where the wire is was thoroughly glued down. The circuitboard is receased so no need to be gentle, just don’t angle down.
Tags: broken, device manager, died, no light, not responding, receiver, usb, windows, wireless, xbox 360
Nick Said:
June 28, 2009 at 4:08 am
Dude, you just saved me 20 bucks. Thank you so much. The trick worked just fine.
Shant D Said:
July 7, 2009 at 3:03 am
Wow, talk about Johnny on the spot. Particularly useful considering they no longer sell these things…at least not in my area. Frye’s, Target, Gamestop, Walmart, & Bets Buy all no longer carry it.
It took me nearly 2 hours to get it right, so I’ll just leave this message in case anybody else had the same issues. For starters, do yourself a favor and do not use rosin core sotter. It was all I had unfortunately, almost impossible to make a suitable connection without it dissolving away. For nearly an hour and a half, the best connections I made yielded no results. I was beginning to believe there was another problem, maybe the whole thing was fried, etc…What finally worked was getting a pair of adjustable plyers, clamping down on a perfectly sized piece of sotter right over the terminals, and then melting it. Make sure the sotter is flattened over the terminals as much as possible. If it sits too high, when you go to put it back together, it could get knocked off. Happened to me once, very frustrating. Seems to be working like new now, but I wonder how long it will last.
Anyway, thank you so much for taking the time to post this. People like you are why I go online. Good luck to everyone else!
Shant
Craig M Said:
July 7, 2009 at 10:22 am
Just another note: Worked great for me, the soldering was pretty difficult, I did use Rosin core solder, I initially tried using tiny wires but in the end just a solder bridge worked for me. Messed with it alot till it looked right, plugged it in, perfection. The cosmetic look of my job is horrible, it’s charred, messy, and looks horrible. Practically? Works perfectly.
Thanks for the fix.
MRLoser Said:
July 11, 2009 at 2:21 pm
It worked like a charm for me. Removed the fuse with the soldering iron first and then bridge the gap with a little blob of solder. Workds great now. Thanks for this info!!!!
crmay1 Said:
July 25, 2009 at 12:39 pm
Worked great. Thanks for the tip!
Aleksander Said:
July 26, 2009 at 9:05 am
Thanks man. My reciever just died on me too, after just 3 days usage
I’ll try do what you did. Btw, does anyone know if this might cause it to melt in the future or short circuit?
jw Said:
July 26, 2009 at 9:15 am
Well, theoretically the fuse is there to protect the receiver from surges on the USB bus (I’d guess) and to protect the USB bus from short circuits in the receiver. However, a working receiver with less protection seems better to me than a broken one.
The real increased risk is damage to the PC’s USB port if something goes badly wrong, so perhaps plugging it through a hub is a good idea after this modification?
Mike Said:
August 17, 2009 at 10:52 pm
Holy Sh*t,
You saved my life… (btw i just got to college, and don’t have soder in my room, i used a piece of foil and electrical tape, then i used a wad of tape behind the board to create pressure on the foil to stay in contact. works like a charm.)
jeff smith Said:
August 30, 2009 at 4:47 am
SWEET i just did this on my new 1 i got off e bay it worked gate sept i pules the ols fuse off with the sodder gun lol but i just bridged it with sodder lol thanks live saver
Roydon Said:
August 31, 2009 at 3:30 am
How long does this last? Can anyone verify ? and why does the fuse blow in the first place?
Can some one verify if their ‘fixed’ recievers still work?
jw Said:
August 31, 2009 at 8:43 pm
Mine’s still going fine for the 2 months since I posted.
No clue why it blows – it does concern me a little, but I figure that having an irreplaceable fuse is a really, really stupid hardware design in any case. Had it been replaceable then this would all be simple.
Roydon Said:
September 1, 2009 at 12:51 am
Imagine, I just removed out of the packing and it never worked right from the start. Im hoping its the same issue. Before I go head with this I just want ot confirm a few things.
1) Should i remove the fuse and just put a blob of solder to connect the two (i gues it would be easier this way ) OR
2) Solder across (Not really sure how you do this. What if i just put a blob of solder on the fuse and spread it a little so it touches both the leads , will that work?)
jw Said:
September 1, 2009 at 7:25 am
If it didn’t work from the start, you really should think about returning/exchanging it rather than opening it up. Should that really not be an option then the easiest thing to do is just remove the fuse and connect the pads with a blob of solder.
However, to test if this really will fix the problem you can just get a small wire and hold it across the fuse while plugging it into the USB. That way you’re not soldering something up if it won’t fix it.
Roydon Said:
September 4, 2009 at 12:17 am
IT WORKED !!! Its easier to just remove the fuse and then add a blob of solder. WooHoo! Just hoping it lasts for a long time (*fingers crossed*)
anil Said:
September 6, 2009 at 3:53 am
Hi,
i think i have same problem. I connect it to my computer its not detected and no light glows. I did open the box. I never did any shouldering and I dont have any shouldering equipment as well:-(. Is there any easy way I can do it at home itself rather bringing it to hardware shop to do it. Any replies appreciated. waiting for reply. Thank you in advance
jw Said:
September 6, 2009 at 2:05 pm
To fix it you’ll eventually need solder. You can test it by connecting the sides of the fuse with a paperclip (or something else metal) while you plug it in and see if that works.
anil Said:
September 6, 2009 at 9:48 pm
thank you very much today i went out and did the soldering and it works perfectly now. I dont know how long this fix will be, But tell you what hats off to someone who found the solution and one who posted here. Really u saves so much money and time for all these people a big thank you for you. I think there are many people with this problem who wouldnot have made to this post I think microsoft should post this issue in their support as so many people are witnessing the same problem. Thank you very much once again for the help
phil Said:
September 7, 2009 at 3:12 am
hey, this saved me some money, i almost ordered a new one. Didn’t have any solder, so i used foil paper and electrical tape like someone posted above and it worked, thanks a million for this.
Ben Said:
September 7, 2009 at 7:10 pm
Just spent the evening unpacking a pallet of customer returns. Found 25 of these in there, all wouldn’t power on. Was about to bin them and then found this! Just finished fixing the last one and all 25 had the exact same fault!
Thanks!
Mr X Said:
September 12, 2009 at 1:56 am
Worked great. I used a 2mm piece of metal from a resistor to bridge.
Thanks from England UK!
Bruce Said:
September 13, 2009 at 9:34 am
It worked for me. My old Radio Shack soldering iron would barely get hot enough to melt the solder, but I finally got it to work. So far so good. Thanks for this excellent info.
Jeff Said:
October 7, 2009 at 8:50 pm
Thanks for the tip! I was pretty mad When I realized my receiver stopped working and searched the net for answers and I’m glad I came across your page! I did what you said and Not so far my receiver is working. The soldering was a bit tricky being that its so small of a space for a noob solder’er. I managed to get a very small piece of wire and lay it across the two points and solder it there and cut off the extra wire. Trying to get a blob of solder to lay across to bridge it was just to difficult without burning the board up.
Matt Said:
October 8, 2009 at 10:59 am
Thank you very much for this! I had to go the tinfoil/electrical tape route but it works like a charm.
Chuck Said:
November 10, 2009 at 9:59 am
Not the best soldering job. A big ball of solder over the fuse, but works perfectly!
Thank you!
Bosh Said:
November 19, 2009 at 10:04 pm
I love you so much for this man!
YOU ARE THE CHAMP
To everyone experiencing shitty reciever problems, THIS IS MOST LIKELY YOUR ANSWER YOUVE BEEN PRAYING FOR
I have never soldered before, but after four or five goes of placing a giant blob of sodder inbetween where the fuse is ment to go i got it. DONT GIVE UP HOPE KEEP TRYING
Thanks man!
RaresH Said:
December 1, 2009 at 11:23 am
Thanks man, worked perfectly, soldered across fuse, hope it lasts
Altoid Said:
December 2, 2009 at 9:29 pm
Funny how everyone who’s had this thing has had the same problem. I took a piece of foil, bridged the two points, taped it up, and it works fine. I’ve had this thing for over a year and it’s sat in my closet because I thought the problem was bad drivers. Today I installed Windows 7 so I figured I’d give it another shot. Didn’t work, so I googled and found this page.
Hopefully there won’t be any ill effects of bypassing the fuse. I don’t plan on leaving this thing connected while unattended, that’s for sure.
microsucks Said:
December 5, 2009 at 10:52 am
hope this works! thank you very much kind sir! i was running amok inside our house asking who broke the damn thing! i had this receiver for less than a month! and i only use it on weekends. shouldve bought the wired. damn microsoft
Jim Said:
December 10, 2009 at 12:43 pm
Just had the same problem and found this little mod on here and this fixed my problem.
People having difficulty getting the solder to stick to the fuse to bridge.the connection. You must always heat the fuse as well. Solder will not stick to cold metal it will just fall off.
I may do a bit more research and see if there is an alternative to just bypassing the fuse. Maybe a fuse with more amps would work better. Adding a resistor which is what I think MS should have done so it lessened the flow of voltage to the fuse thus less likely to blow. Way to fail MS at making something work.
Also my receiver did last about 2 months which I think is pretty good for this controller.
anyways thanks for this post. It helped a lot and I imagine will help many more people to come.
James Said:
December 11, 2009 at 8:07 am
Great work bud! This is my 2nd controller. This one lasted 11 months, the 1st lasted 2 months. I’m going back to the shop today to see if i can still get the warrenty replacement but if they give me grief, i’ll do this fix.
Thanks heaps
Jason Said:
December 29, 2009 at 8:37 am
Nice work bud. Worked like a charm for me as well.
Ironic how the gaming community can fix all kinds of electronics, but M$ can’t even design a wireless receiver that works for more than 6 months without breaking.
Nasa Said:
December 31, 2009 at 6:13 am
NICE WORK PEOPLE
dont leave it on 24/7 (ie unattended) as there was a fuse there for a reason….
have fun gaming
Ryan Said:
March 9, 2010 at 7:54 am
Thanks, worked great! Saved me some cash cause I heard you can’t buy the receiver on its own anymore.
shane Said:
May 14, 2010 at 6:30 pm
This does indeed work and only took about 5 min to do! Doesn’t make any sense it having a fuse. Almost all usb devices don’t have a fuse as usb is low voltage and low Ma. Seems it’s so you have to keep buying their stuff to me
lilPete Said:
May 31, 2010 at 4:24 am
Genius! Thanks for this, saved my shelling any more money to that mind boggling corporation.
And my soldering iron needed its dust blown off anyway.
Happy gaming for me, thanks again!
MrBozack Said:
June 6, 2010 at 12:16 pm
I just tried to use my wireless controller, and it seemed dead. The LED was not illuminated, not listed in device manager.
First google hit, I find this page with beautifully detailed description of my fault and even a resolution. Many thanks for the bonus insight, I’ll try this tomorrow. I am confident it will work, if not it’s worth a shot!
Thanks again!
harcalion Said:
June 6, 2010 at 9:50 pm
Tried the paperclip today -> Worked.
Will try soldering tomorrow.
Amazing how easily this thing can break.
Thanks to the poster and the guy that identified the fuse.
harcalion Said:
June 8, 2010 at 3:56 am
I destroyed the circuit board with my inability soldering. Well, I was too worried to plug it back into my brand new PC.
jw Said:
June 8, 2010 at 6:20 pm
Sam Said:
June 9, 2010 at 1:16 am
Havnt got mine yet (coming tomorrow) but if it goes wrong ill know where to look.
Was thinking whats the posability of soldering a switch in place of the fuse for easy on/off without unpluging/repluging?
jw Said:
June 10, 2010 at 8:37 pm
A switch would work, but it would have to either be very small or you’d have to run wires somewhere. It’s on the bottom of the board so positioning it could be interesting too.
citizen Said:
July 6, 2010 at 10:20 pm
“Opening the receiver (use a knife or something to lever the top off):”
lever the top off?? What the hell does that even mean!? I cut my finger trying that!
Anyway, what I ended up doing was jam, and I mean JAM, a butterknife in. Wedging it in the crease that is above the wire (between grey and white). Getting it in there good then wiggle and twist all about until the glue gives way. Because every inch other then where the wire is was thoroughly glued down. The circuitboard is receased so no need to be gentle, just don’t angle down.
Mine was working fine for over a year until I unplugged/plugged it in while the computer was on. Apparently that’s what blows the fuse. Soldering over it fixed it right up.
…lever the top off…
jw Said:
July 6, 2010 at 10:48 pm
Uh, sorry about that. I like seeing how things work so “lever the top off” is just fine for me, but I’ll update the post to make sure blood isn’t spilled in future. I do have it on reliable authority though that blood sacrifices help electronics work better…
f_ilippo Said:
July 11, 2010 at 5:51 pm
HI jw,
do you think this trick works too with Big Button IR receiver?
thanx for answer!
Filippo
jw Said:
July 11, 2010 at 6:06 pm
Filippo: It’s highly unlikely the circuit board is even remotely similar. While the issue could also be a dead fuse, I have no idea how you’d go about finding it.
Daniel Said:
July 25, 2010 at 11:31 am
Holy shit man, I did not think I’d find a problem as specific as this on a discontinued product! I have 4 controllers and a racing wheel I want to use with emulators and this article saved it. Much thanks.
someguy Said:
July 26, 2010 at 4:29 pm
Im worried about trying this fix and destroying my computer, I cant afford to get it fixed and cant afford to not have a computer. Is there anyone out there thats damaged thier computer after using this method?
jw Said:
July 26, 2010 at 6:50 pm
I haven’t heard of anyone destroying their computer, but I guess they wouldn’t be able to post here if they had either. In the end, it’s your own decision. There’s a tiny but non-zero chance you could cause horrible damage to everything around you.
someguy Said:
July 29, 2010 at 3:54 pm
It didnt work for me, I hate microsoft…now I have to spend another 40$ for a wired controller, watch it not work…
Lewis Said:
August 5, 2010 at 3:34 am
Thank you very much for this
It worked a treat!
Mikey_J Said:
August 8, 2010 at 1:52 am
Hey thanks for this, had 2 broken ones now got 2 working ones…. Yipeee, was worried about soldering as i never done before, took 10 mins to get the blob of solder on there and it was a massive blob and before that i’d burnt where the fuse was, didnt think it would work but it was fine
What im trying to say is just give it a go you dont have to be a pro at soldering. With in 30mins i took apart 2 recievers and soldered them both now they both work, Thaks very much JW your a life saver
Wacko37 Said:
August 17, 2010 at 11:10 am
You are the greatest!!!!!!!!!!!!!!!
My soldering looks like shit but it works like a charm.
F*$K microsoft and their “we only give 90days warrenty”
Keep up the good work
Carl Said:
August 25, 2010 at 8:53 am
Thanks for that, worked a treat!!
Eli Said:
August 26, 2010 at 12:37 pm
Thanks a bunch, found this on fixya.com but not surprised if it was ripped off from here. I am no soldering expert but took a few minutes to solder over the fuse and its back to life. Had it in the closet for a while and never used it, died 2nd or 3rd time that I plugged it in. Inept design.
jw Said:
August 26, 2010 at 2:29 pm
Ha, figures someone else would rip the post but no big deal given I ripped it from a discussion thread. Would have been nice to be linked to, but whatever.
epic709 Said:
August 26, 2010 at 9:58 pm
w00t! this actually worked! and here I was scouring the net for a replacement receiver……….some bloke on ebay actually sells receivers with the fuses blown and still tries to sell it as BROKEN (but with soldering instructions). Talk about lazy seller……..
James Said:
August 28, 2010 at 5:04 pm
Thanks for the tip!
Being too lazy to solder and not being able to find my jar of wire glue, I simply drew across the blown fuse with my conductive pen and she works again!
Francis Said:
August 30, 2010 at 1:20 pm
Never thought about checking the fuse, thanks for the tip! You rock!
adit Said:
September 7, 2010 at 8:52 am
Damn it dude!!! worked perfectly, I was using almfoil+electape. no soldering required,. thanks!!
grim Said:
October 3, 2010 at 12:17 am
damn, i googled everything but the word ‘died’ for this problem, … until now …. i even replaced the cable and pins with an oldie
maybe terms like device manager and not responding will get more traffic to this solution
cheers dude
Buccaneer Said:
October 16, 2010 at 3:55 am
Solder bridge across fuse worked a treat, just saved me £9.99 thanks for posting this.
cjmccarthy72 Said:
November 4, 2010 at 4:18 pm
Brilliant worked for me- thanks from the UK!
MNAOC Said:
November 16, 2010 at 7:40 am
Usted es un genio en 5 minutos esta funcionando de nuevo, mil gracias!!!!
james Said:
November 24, 2010 at 1:05 pm
Its true blood sacrafices do help hardware. I have an old MX440 GPU that still works to this day thanks to the heatsink being filled with blood. Those heatsinks are razor sharp.
Fix worked for me as well, got two of these but one was dead, no longer.
Lou Said:
November 27, 2010 at 4:51 am
Just want to say thank you for posting. Much appreciated
xbox wired controller for pc Said:
December 3, 2010 at 7:55 pm
i even replaced the cable and pins with an oldie
maybe terms like device manager and not responding will get more traffic to this solution??really?
Joel The Great Said:
December 4, 2010 at 9:52 am
I must say thank you. Totally awesome and works great now!! (no help from Micro$haft…utterly useless support forums).
Things I learned. Using a ‘Cold Heat’ soldering iron makes the task about 10x harder than a regular solder iron (I’m guessing, cause it was a pain).
Rosin core does make it harder, but still doable.
I’d post more, but I have games to go play now!
Joel The Great
http://www.joelthegreat.com
Joe Said:
December 16, 2010 at 12:49 pm
Count another person saved.
Moments before a big gaming session, I discovered my Xbox Wireless Receiver was no longer working. It happened when I decided to “reorganize” my USB connections and moved some devices from the front panel to the rear.
Used silver solder at 700 degrees F, first I removed the broken fuse at F1 – a very small rectangle black component, then I soldered over the connections. Warm each side of F1 for a few seconds then place a BB sized drop of solder on the tip of your soldering iron, as long as the two side of F1 are hot enough, when you touch the still host BB sized drop of solder it will flow to each side and make a nice clean connection.
Thanks!
Josh Said:
January 14, 2011 at 1:22 pm
Thanks so much for that! I’m an electronics technician so this operation was done in about 7 min for me and you saved me 20$ plus 4 weeks without playing Just Cause 2 !
JD Said:
January 18, 2011 at 10:53 am
Just soldered it myself (rosin core), got it on the second try.
First I removed the fuse by applying some heat to it, but ended up using some little snippers to cut it out. Once the fuse was gone, I cut a little piece of solder and laid it where the fuse was. Applied some heat to secure it, and didn’t work the first time. I went back, melted and swirled it around a bit (lol – very technical, I know), and suddenly the green light appeared when I plugged it in!
Thank you very much!
Chris Said:
January 30, 2011 at 5:15 am
Works like a charm! Thank you so much for this.
I wonder if it wouldn’t be best to find a replacement for that fuse, instead of bypassing it. But I guess it might cost just as much as buying a new receiver.
Anyway, thanks a lot for a great tip!
jw Said:
January 30, 2011 at 12:34 pm
Probably would be best to find a replacement fuse, but I really have no idea where to source surface mount components, much less figure out what the actual size of the fuse was and what it really should be (given that it appears to be too small).
Chris Said:
February 15, 2011 at 2:20 pm
Thanks for this! I super-glued a small piece of foil (from a chocolate coin) onto the PCB right next to the fuse, then shaped the foil onto the fuse. It’s working fine so far.
illy Said:
March 11, 2011 at 12:43 pm
dude, THANKS. almost threw mine away before i found this article. you saved me some money!
JunkInternetMail Said:
April 9, 2011 at 6:25 am
I just nutted finding this. My google-fu helped me see this blog article.
Then when I tested using a paperclip I literally nutted.
Thanks.
Geoff Said:
April 28, 2011 at 1:19 pm
WOOWOWOWOWOWOWOWW
I was absolutely amazed that this worked.
Apparently this device is a power whore and when you use to many usb devices without an external hub this fuse blows. The device was working fine then I installed a new high end mouse and keyboard and the fuse on this thing went. The trick worked beautifully.
Thanks so much
Jeremy Said:
April 30, 2011 at 2:36 am
Thanks, you saved me $20. Crappy M$ hardware.
Paulo Oliveira Said:
April 30, 2011 at 12:38 pm
Maaaaaaaaaaaaaaaaaaaaaan… WOW!!!
You saved me $30… Crappy M$ hardware…
Greetings from Brazil! =D
Stevearama Said:
June 19, 2011 at 3:12 pm
I know this is old.. but i also wanted to post and say thank. took me a few goes to get the connection, but the controller now works.
again.. you saved me 20 bucks… so i owe you a beer.
Taco Said:
July 2, 2011 at 5:40 am
Don’t know if you’ll ever read this, but I freaking love you. Thanks. So glad this worked, especially as you can’t really find these things anymore without buying the entire controller package (not cheap!).
jw Said:
July 2, 2011 at 9:29 pm
Still reading, and still happy I’m helping people.
Phing Chov Said:
July 4, 2011 at 6:17 am
Awesome job! Thanks for posting the pictures!
I wish I would have found this a week ago, I could have saved some money! Either way, now I have two of these receivers!
Thanks!
hoki Said:
July 4, 2011 at 9:38 am
Can someone who used “foil paper method” give me some tip?
It seems not work fine on me, the green light turns on but not stable, I don’t want spend some money to buy a soldering iron! But i think buy a soldering iron is better than buy a another receiver….
anyway, thanks for posting this!
jw Said:
July 4, 2011 at 7:25 pm
If the light isn’t stable then it probably means you’re getting a bad connection between the foil and the metal ends of the fuse. The fact it turns on at all seems to indicate that you’ll have success with a more permanent solution.
Note: I haven’t tried the foil method myself, just guessing here.
Wynadorn Said:
July 4, 2011 at 9:04 pm
Also reporting that this fix worked for me.
I recommend using a flat screwdriver directly from the start. I first used a small screwdriver, then a larger one, and once I had it pyed open a bit I used a knife over de width of the receiver to fore the top off.
Thanks Chris for noting that foil can also be found around chocolate, we didn’t have any though I found some around a chocolate bar.
hoki Said:
July 5, 2011 at 12:47 am
I think i need to buy a soldering iron finally, the foil paper method is really danger i think, when i put a piece of foil paper on the fuse, it sparkled!(short circuit?) And the chips became extremely hot! I nearly burned my finger!
Glenn Said:
July 9, 2011 at 2:14 am
Thank you for this article, I just experienced the same problem and google brought me here.
Advice for getting the top off – Start at the top under the rubber sleeve where the cable enters. I used a flat headed screwdriver and leveraged the middle and worked my way left and right until the top was clear, then work down the sides – crack it off, it’s not a pleasant feeling.
With the soldering – I actually removed the broken fuse rather than soldered on top of it. It’s so tiny it falls off by just heating each side a couple times over. Then add a blob of solder in the gap and use the irons point to push it to each terminal to connect it to both sides. It doesn’t need to be neat or beautiful, just make sure you don’t touch the other tracks and only heat the board in short intervals.
Great fix and easy to do, thanks again!
hoki Said:
July 10, 2011 at 9:12 am
I bought a soldering iron finally, but this trick didn’t work for me:sad
It seems i am the second one who fail this trick>_<
Can someone upload a tutorial video to Youtube? I appreciate that a video more than just words(not a complain)
Chris Said:
July 21, 2011 at 1:00 pm
It worked!! Do what @Glenn says, removing the fuse is much easier than trying to get the solder to flux to the fuse terminals. Then just drop a ball of solder on the board where the fuse was. Mine was big and ugly because I forgot to change out my flathead tip before heating up the iron, but it worked like a charm!
I wish I knew this when my first one failed a couple years ago. I can’t believe MSFT would overlook such an obvious design flaw. Actually I can, they’re a software company. Not their first engineering failure (Xbox 360 RROD…)
Manoug Said:
July 28, 2011 at 12:01 am
Thank You! Right on the money. Dropped a quick solder joint between F1 and did a quick test worked like a charm. At first I had a little tough time getting the lid off however I started at the rubber bushing where the cabling enters and used a small flat blade screwdriver and started to pry working my way to both 11 and 1 oclock positions then muscled the lid off once I was able to get enough leverage. I will problably use a few dabs of some non permanent glue to reattach.
Thanks again for posting this it saved a few bucks!
Antoine Turmel (GeekShadow) Said:
August 10, 2011 at 9:53 am
Work great
I did use tape and foil paper.
I’m sure the fuse did blow during a power outage some days ago.
Antoine Turmel (GeekShadow) Said:
August 10, 2011 at 10:24 am
You should do a post on : http://www.ifixit.com/
Stretch Said:
August 31, 2011 at 9:22 am
Bluetac and kitchen foil. Hell yeah!
Breeanna Said:
September 28, 2011 at 12:43 pm
Worked like a charm! Saved me from throwing out my controller! or worse buying another reciever for $20 bucks! 0.0!
zen smith Said:
October 3, 2011 at 9:43 am
Thanks for the tips guys, did this in about 5 mins other than the taking it apart.. which took me a while until i saw the part about the butter knife
Johnn Said:
October 7, 2011 at 5:44 pm
Hope someone can answer me this question, i just bought the controller (JR9-00001) and came with the receiver and now im reading all those issues about the receiver stopped working, i have mine plugged to the motherboard all the day around 12 hours daily (since a week) but now im worry about pluggin in just when i use it or leave it connected like now.
jw Said:
October 7, 2011 at 5:52 pm
I have no idea what triggers the fuse to blow. Obviously it won’t blow if it’s not connected, but if the blowing is related to powering up/down then you could make things worse by only plugging it in to use it?
Bad answer, I know – sorry!
Johnn Said:
October 8, 2011 at 1:22 am
That was what i thought, so i’ll leave it plugged to the computer, Thanks a lot for your answer didn’t expect that you will answer in minutes.
jw Said:
October 8, 2011 at 2:58 pm
It helps to have email notification of comments on. Good luck with your receiver.
colin Said:
October 8, 2011 at 3:25 pm
found mine was dead today, thanks for the info help me a ton.
Mine was always plugged in so that wont keep it safe, guess its just random chance.
Patrick Said:
October 12, 2011 at 1:27 pm
Worked perfect, hardest part was getting the damn case open. THANK YOU
dan Said:
October 14, 2011 at 5:45 am
Okay. Now I see what I must do. So glad to have come across this via google. I’ve never soldered before but it seems like the more trusty route if I can avoid scorching the thing. Any tips on the soldering technique?
By the way thanks for sharing this information so that those of us who have a brain can wield it like a Samurai sword!!
jw Said:
October 14, 2011 at 9:01 am
Once you have the case open, enough heat to melt the solder on both sides of the fuse so you can remove it. Then use just enough solder to bridge the two contacts where the fuse was. It’s mostly just being careful to not hold the iron on the board for too long – just enough to melt the solder is enough.
abdulhkeem Said:
October 24, 2011 at 6:59 pm
i done mine today it blew yesterday tou saved me from buying a new receiver
took me 4 or 5 tries to get it right
thanks agian man really
Jim Said:
October 30, 2011 at 1:12 am
Worked just fine for me too,
I haven’t used the controller for quite some time and today it was like dead. Thanks for the great tip.
rey Said:
October 30, 2011 at 1:50 pm
Thank god for this blog post. I was really upset to find out my receiver wasn’t working and used google to find a solution. I followed the steps of the blog post and everything worked out well. Only problem I had was almost stripping the screw that mounts the panel onto the plastic casing.
dominic Said:
November 19, 2011 at 5:04 pm
thank you thank you thank you! i shall return to skyrim now.
Maranzintosh Said:
November 27, 2011 at 10:18 pm
Perfect hint mate, i thank you so much from Italy!
p.s. i hadn’t a soldering iron, so i used a piece of the foil case of china take-away!
Jonathan Said:
December 11, 2011 at 7:46 am
Just leaving another thank-you. This fix worked perfectly for me!
John Said:
December 16, 2011 at 2:25 pm
Hey man! Thank you so much! I’ve had my receiver for two years, plugged it in to play a game and it was dead. I de-soldered the old fuse and attempted to bridge the gap and got a big glob of solder across my other components. Had to de-solder that and scrape it off, tried again and success! Thanks again!
Krystian Said:
December 21, 2011 at 7:22 am
THANK YOU SOOO MUCH. IVE BEEN TRYING TO GET MINE TO WORK FOR SOOOOOOOOOOO LONG!!! YOUR DA BEST!
Roy Baker Said:
December 22, 2011 at 8:46 am
Thanks, this guide helped fix my wireless receiver after it randomly died in the middle of an online game. Used aluminum foil and electrical tape and the receiver is working great again.
Unlimate Said:
December 24, 2011 at 4:31 pm
Thank you very much sir you saved my 22 bucks and 2 week waiting for new receiver!!!
)))))))))))))
You are beast man thanks again
Phokal Said:
December 31, 2011 at 6:53 am
Yup, this worked for me as well. After unplugging it and plugging it into a new computer, the light would not turn on. Plugging it back in the original computer, the light would still not turn on or detect as new hardware.
I had a friend Cracked it open and performed this solder with a wire across the top and it detects and works fine now.
Thanks a TON. It is not easy to order a new replacement for this wireless adapter.
SoZuu Said:
January 9, 2012 at 9:59 pm
Worked, many thanks!
Eric Said:
January 31, 2012 at 1:37 pm
Thanks! Saved me $20.